PHOTOMODE CLEAN UP
In this tutorial I will attempt to show a fairly simplistic way to clean up the horrible job of shading that the PS2 often does in pictures created in Photomode/Photo Travel.
One thing that I need to point out about all of my tutorials, is that I am a PC Photoshop power-user. That means I use a LOT of shortcut keys to speed up the work flow. I will make note of them when they are used so that, if nothing else, you will learn a few of them by the end of the tutorial. :)
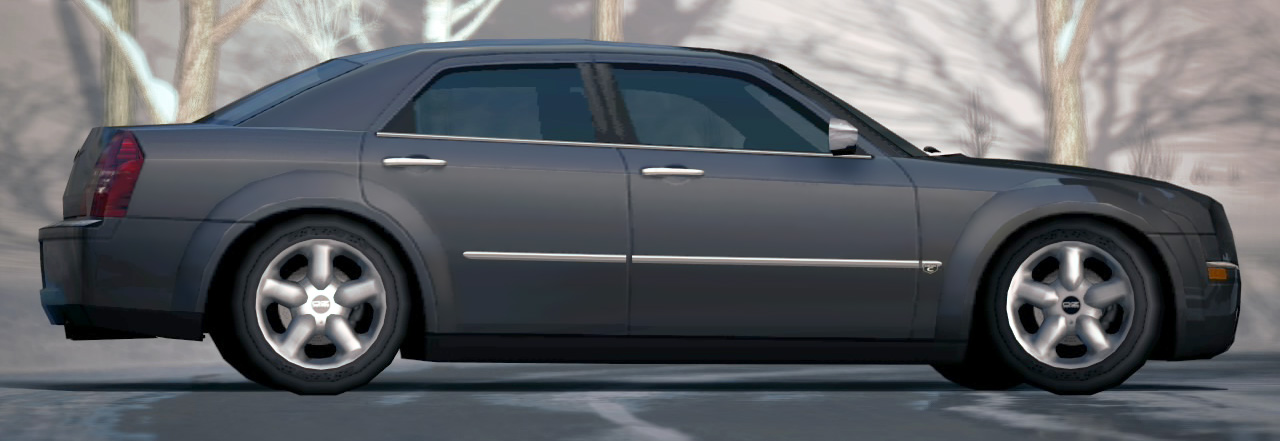
1) Let's start with our unaltered image below. I have made it in to a link so you can copy it to your system if you wish, but for this tutorial, I suggest you do to make the explanations easier.

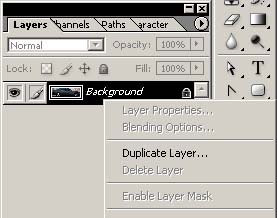
2) Okay, the FIRST thing that I always do, and I recommend that you do as well, is duplicate the image by creating a duplicate layer.
- RIGHT CLICK on the layer called Background, and choose the only option available to you "Duplicate Layer ..."

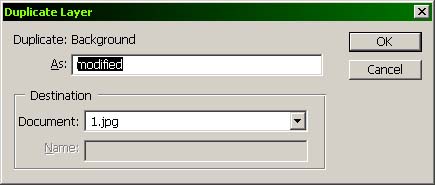
- This will bring up the screen below that allows you to rename the layer. I chose "modified" as the title. Press "OK"
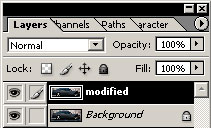
- The layer modified, will automatically be selected for you by Photoshop.
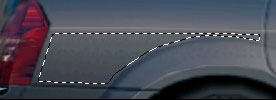
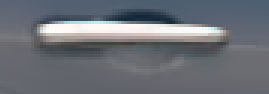
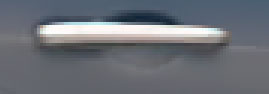
3) Start off by zooming in on the first of the sections we want to "repair", the rear quarter panel. (We will work from the back to front of the car). We also want to divide the area in to even smaller portions in order to get the best results
- Press the "z" key on the keyboard to choose the ZOOM tool.
- Drag the marquee around the upper section of the quarter panel and release. We want to make it almost full screen so that it will be easier to select the parts we want.

4) Now we need to lasso the section in question.
- I find it easiest to work with the polygonal lasso, so hold down the "SHIFT" key and press the "L" key on your keyboard until the icon on your toolbar looks like this .

- Now look at your Lasso toolbar. It is directly below the main set of menus, so you should see the image below.

- We want to set the Feather option to "1 px" and check Anti-Aliased. The reason we do this, is to reduce the likelihood of "sharp" edges remaining around the selection we just repaired after the marquee is dropped.
- Now put a marquee around the first section with a series of "click-move-clicks". Leave a little room next to the obvious edges of the selection so that when we use the filter on the marqueed portion, we don't "bleed" over in to the areas we want to keep clean. Now close the marquee by clicking on the first place you clicked.
NOTE: When you are done, you probably want to set the Feather back to "0" so that the next time you use it, you will have a clean marquee edge.
5) Okay, let's clean up this mess. When I first looked at the bad ares of these cars up close, I was challenged to come up with the best way to fix them. My first thought was to use the Blur Tool and just go over the border between the shades and smooth them out. The second was to select the areas, like I have done, but use the Gaussian Blur filter. I decided against both because a) using the Blur Tool would be way to labor intensive and b) the Gaussian Blur filter is too hard to control because it brings in color from beyond the marquee - and that was not a good option. So we will use the aptly named, Smart Blur.
- From the Filter menu, choose Blur > Smart Blur ...
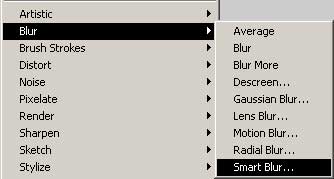
- Now here is where a bit of trail-&-error comes in to play. You will need to adjust the Quality, Radius and Threshold to points where all the "pixelation" is gone and without creating a dark edge around the marqueed area. For this section, a Quality of High (what I always use) and a setting of Radius "5" and Threshold "25" seem to be the best. When you are satisfied with the settings, press "OK".

- Before you drop your selection, you need to verify that there are no anomalies, such as a non-blued area, present in your selection. If there are some, use the Blur Tool
 with setting like below in order to "smooth" out the rough parts.

- If all is well, drop the selection with "CTL-d".
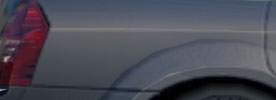
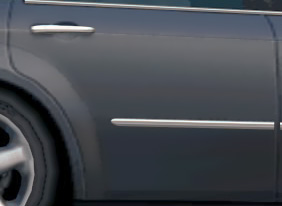
6) Lets move on to another section that has some serious issues - the rear door. As you can see in the image below, it is rather ugly. This is mostly due to the folks over at Sony, not having the highest faith in the games shaders, so they decided to paint some of the shadows on the car instead of rendering them. Whatever.
- The door will need to be divided in to four areas (1-4) in order to get the best results. For each step you will select one of the sections, as we did above, and then run the filter on it. Be sure to check for those anomalies BEFORE you drop the marquee ("CTL-d") should they arise near the edge. Once again, press the "L" key to choose your Lasso Tool and create your selection.
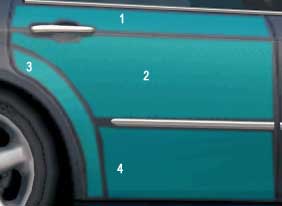
- For section one and two, the same settings we used above (Radius "5" and Threshold "25") work very well. I did, however, have to use the Blur Tool to clean up a small section around the door handle that was a bit too sharp.
- On section three, I had to drop the Threshold down to "15" in order to to avoid creating those dark edges that I spoke of earlier.
- Section four, was done just like one and two.
- The completed door is below - before and after.

6) The obvious next step is to continue with the rest of the errors that remain on the car.
- Select one section at a time
- Lasso it off
- Launch the Smart Blur filter
- Check the results by clicking on the thumbnail pic
- Apply the filter when its right
- ... and move on to the next section. (I used 19 separate selections when fixing this image.)
After I had finished with all the "large" work, I reviewed the entire image at high zoom, and fixed any small stuff I thought needed it, with the Blur Tool.
Here is the end result: Before and After

I hope that this has been helpful to you, and that it will make your shots all the more exciting. Good luck and happy Photoshopping!
-= Vicious =- VP